How To Make A Baby Sock Monkey - Tutorial
It's spring and that means new life, the flowers are starting to peek out from their winter sleep, and baby animals are being born. What could signify spring more than an Easter chick or a lamb gambolling around a field?...well a baby sock monkey!
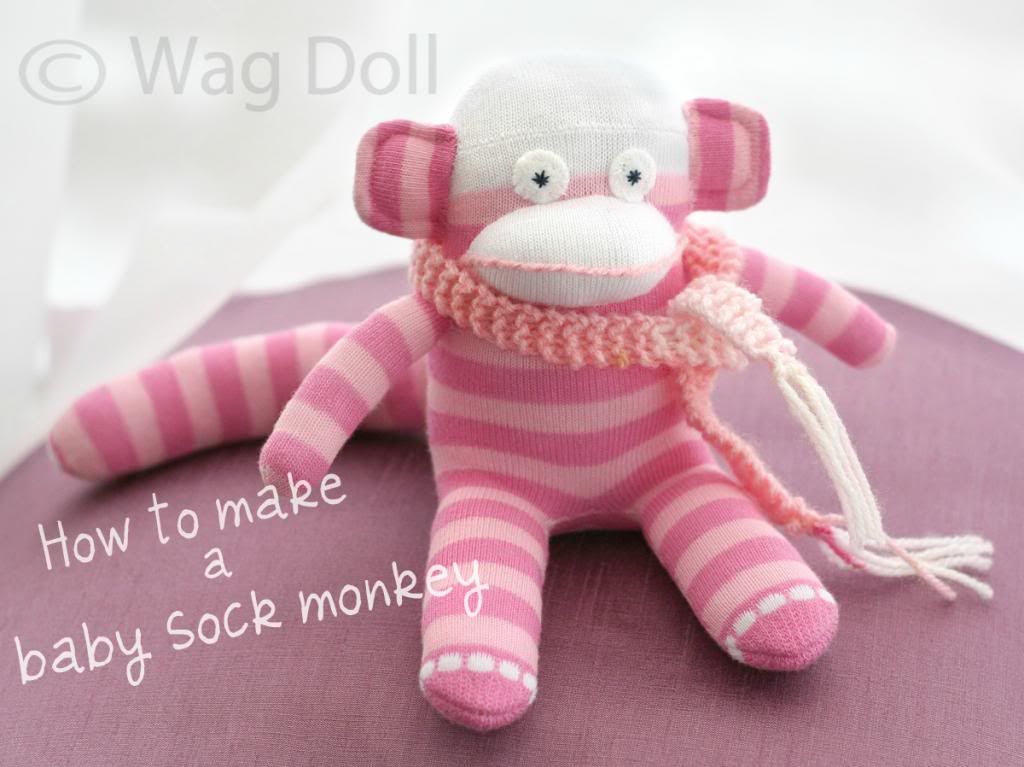
Aw bless her little cotton socks!
You guys probably know I love making sock monkeys and have made plenty here, here and here over the last 2 years. They were one of the first steps on my sewing journey and are a great beginner project for crafters.
So I thought I'd share with you guys how I make my sock monkeys. There are plenty of tutorials out there for full sized monkeys, but here's how I make a baby monkey. (Beginners may wish to start with a full sized monkey first, babies are a touch more fiddly as the pieces are smaller.)

Read on for a step by step tutorial...
OK, so here we go with a photo heavy tutorial, it looks like a heck of a lot of steps but I've gone into detail at every stage. Once you've made a couple of monkeys you'll whizz through them at no time!

5. Turn the remaining sock inside out and flatten this one in profile. Using the non-heel portion, draw a line almost touching the heel portion, from the toe of the sock, once again curving the line at the ankle end as in the pic. Sew on the line, leaving long threads.
6. Cut the tail out near the stitching line.
7. Trim around the curved edge, and cut straight across the top of the tail discarding the toe section of the sock.
8. The remaining piece of this sock will become the arms, snout and ears. Keeping this piece flattened in profile, trim off the elasticated ankle portion and discard. The ankle of the sock (rectangle on the left) will become the ears. Cut out the heel section to become the snout. Trim off the toe section of the sock and discard. The foot section (rectangle on the right) will become the arms (Keep the pieces in their folded states, right sides together)
25. Attach the arms on the monkey approximately halfway down the torso. Using one of the long threads left from machine sewing, hand sew the arm to the body. Use small stitches and tuck the raw edges under. I sew around the arm twice, then knot and hide the loose end in the monkey body.
26. Attach the tail to the monkey in the same way. I position the tail just above the heel of the sock (monkey's bottom!)
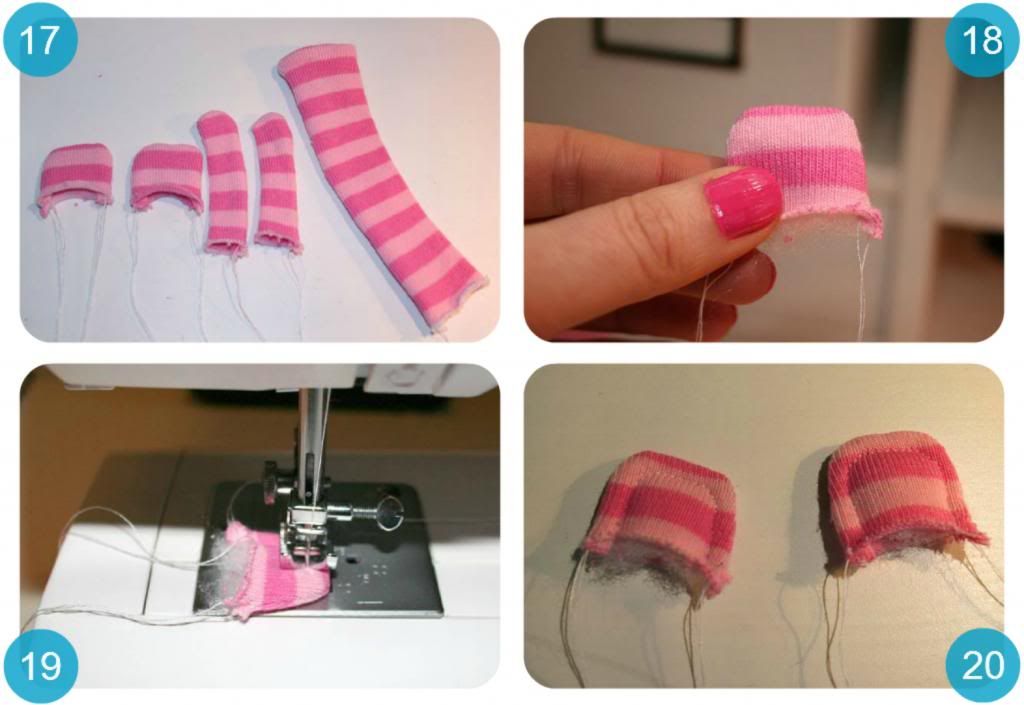
27. Attach the ears, once again using the long threads to hand sew the ears on each side of the monkeys head. I position the ears midway between the arms and the tip of the head.
28. And your monkey is now looking very monkey-like!
29. Take the heel piece cut from the second sock in step 8 and pin it to the monkeys face. I line up the edge of the snout midway between the arm and ear. Do not pin the snout tight & flat, it needs room for the stuffing.
30. Hand sew the snout to the body, tucking the raw edges under and using small stitches. Leave a half inch gap for stuffing.
31. Stuff the snout firmly.
32. Hand sew the opening closed.
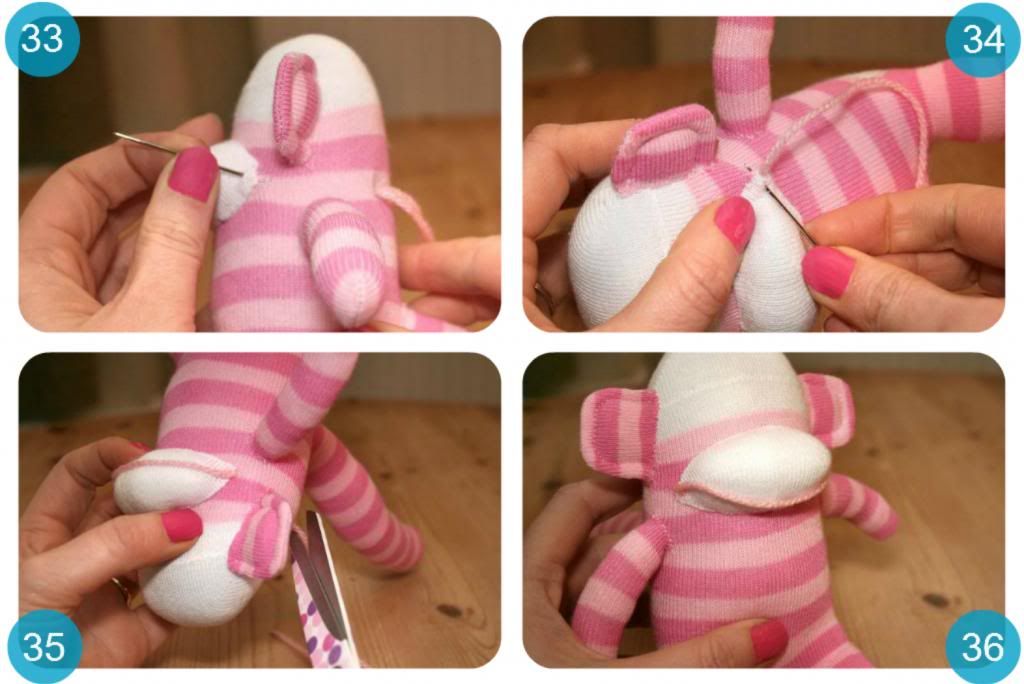
33. Make the monkey's smile. Thread a large needle with wool and insert it from the back of the monkeys head, bringing the needle out at the edge of the snout.
34. Do a single backstitch at the edge of the mouth.
35. Take the wool over the snout and do a single backstitch at the other side of the mouth, taking the needle back through the head and snip off the remaining wool.
36. You now have a monkeys smile that needs stitching into place, you don't want a sad monkey!

Aw bless her little cotton socks!
You guys probably know I love making sock monkeys and have made plenty here, here and here over the last 2 years. They were one of the first steps on my sewing journey and are a great beginner project for crafters.
Any mistakes just add to their charm!I even held a giveaway a few months ago to win a gym timer or one of my sock monkeys.....the sock monkey was by far the most popular prize :-)
So I thought I'd share with you guys how I make my sock monkeys. There are plenty of tutorials out there for full sized monkeys, but here's how I make a baby monkey. (Beginners may wish to start with a full sized monkey first, babies are a touch more fiddly as the pieces are smaller.)
Read on for a step by step tutorial...
OK, so here we go with a photo heavy tutorial, it looks like a heck of a lot of steps but I've gone into detail at every stage. Once you've made a couple of monkeys you'll whizz through them at no time!
To make a baby monkey you will need:
- A pair of infants ankle socks
- Matching thread
- Felt circles for eyes
- Wool for the mouth and dark embroidery thread for the eye pupils.
- Poly wadding for the stuffing.
- Sewing machine
- Hand sewing needle
- Scissors, pins and a ruler.
What a body!
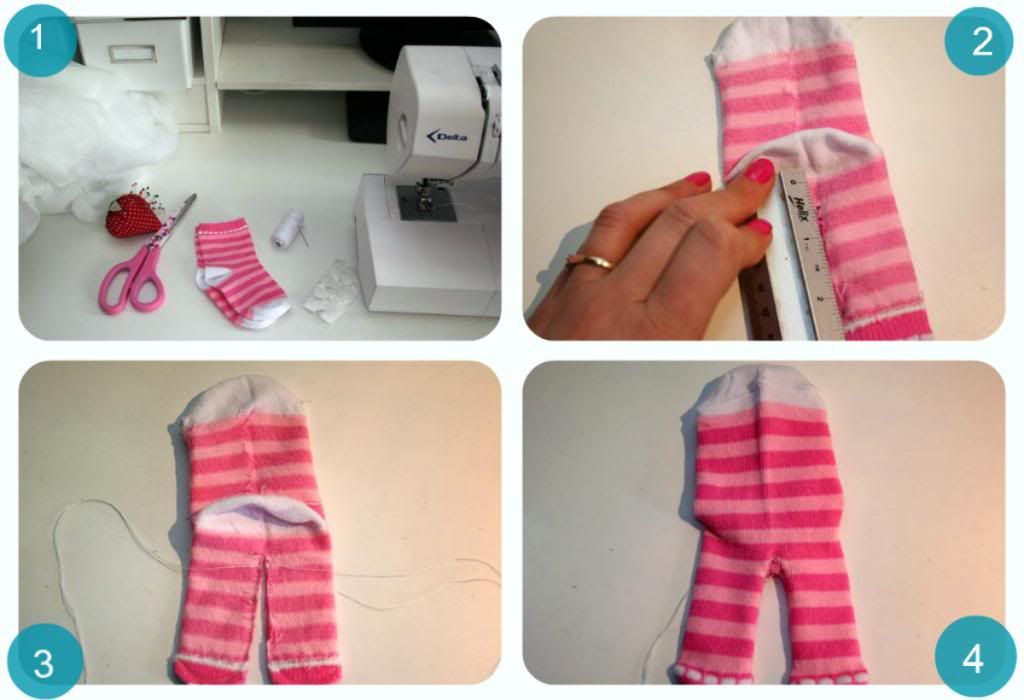
1. Gather your supplies together.
2. Turn one sock inside out and flatten it with the toe at the top and ankle at the bottom. Draw a line that begins half an inch from the heel towards the ankle. When your line reaches the elasticated ankle section, draw a curve around the bottom edge, curving up towards the outer edge to create a rounded foot shape.
3. Sew down either side of the line, following the curve to make the feet. Leave long threads (you'll find out why later!). Cut between the 2 lines of stitching, cutting slightly higher than the stitching to create a gap for turning through.
4. Using the small gap, turn the sock right side out.
A tall tale and other bits...
6. Cut the tail out near the stitching line.
7. Trim around the curved edge, and cut straight across the top of the tail discarding the toe section of the sock.
8. The remaining piece of this sock will become the arms, snout and ears. Keeping this piece flattened in profile, trim off the elasticated ankle portion and discard. The ankle of the sock (rectangle on the left) will become the ears. Cut out the heel section to become the snout. Trim off the toe section of the sock and discard. The foot section (rectangle on the right) will become the arms (Keep the pieces in their folded states, right sides together)
With open arms!
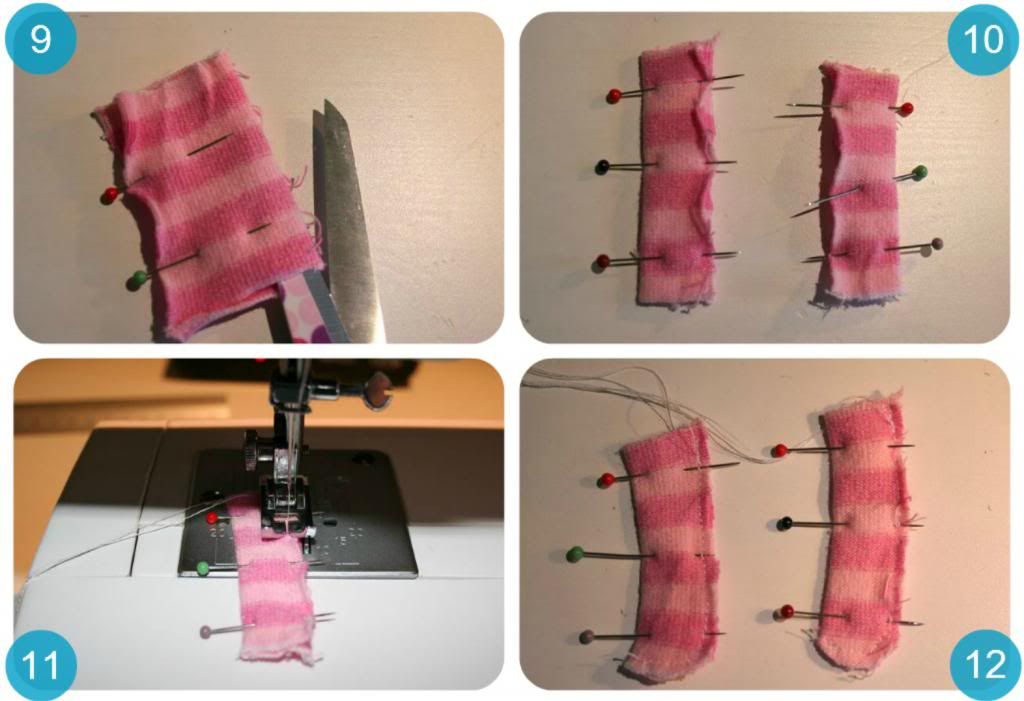
9. Using the foot rectangle from the previous step, cut down the folded long side to create 2 pieces. I tend to put a couple of pins in before cutting as shown in the pic.
10. Fold each of the 2 pieces in half, right sides together, and pin in place.
11. Keeping close to the edge, sew down the long edge and again sew a curve around one end. Go sloooowly if you are sewing over pins like me...naughty :-) !
12, Trim around the curve, and the arms should look like this pic, open at one end, long threads and curved at the other end.
Listen up! The ears...
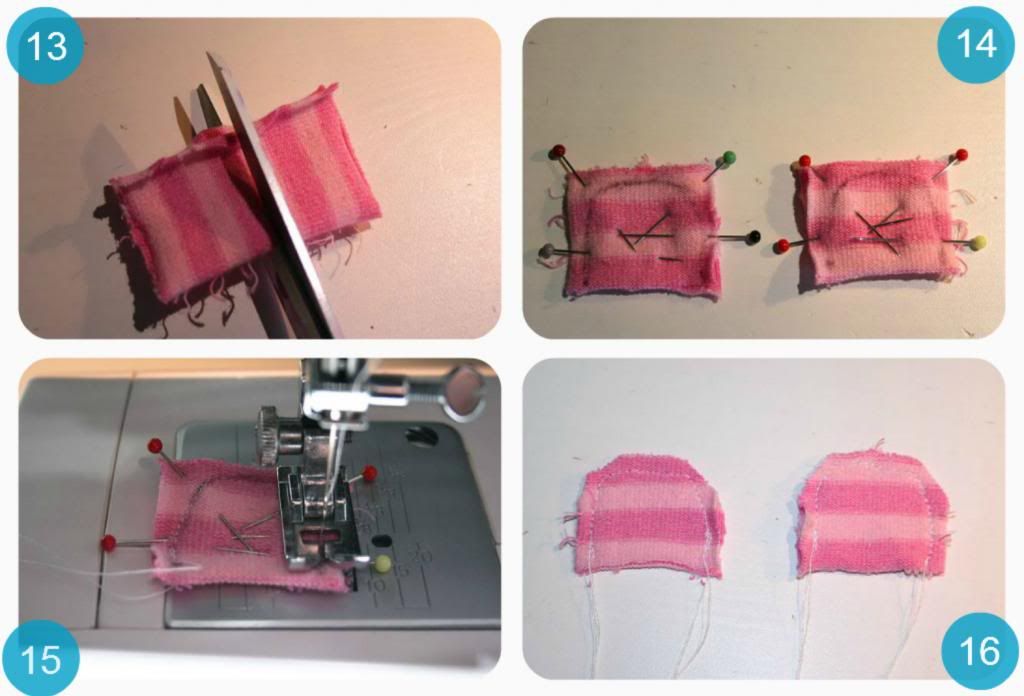
13. Take the rectangle of fabric from the ankle in step 8. Keep folded (the fold is the lower edge in the pic with tiny threads sticking out) and cut in half at right angles to the fold.
14. Keeping the pieces folded, pin them to keep them in place, and draw a curved shape (the fold is at the top in this pic) leaving the bottom edge open.
15. Sew on the curved line.
16. Trim the ears, again leaving long threads.
The turning point...
17. Turn all the pieces right side out, use a knitting needle to gently poke to the curves and corners out.
18. To give the ears some substance, put a small amount of stuffing in them.
19. Top stitch on the ears, following the curve and leaving the bottom edge open.
20. Trim the threads from the top stitching. The ears should now look like this, still with the long threads from step 16.
Stuff and nonsense...
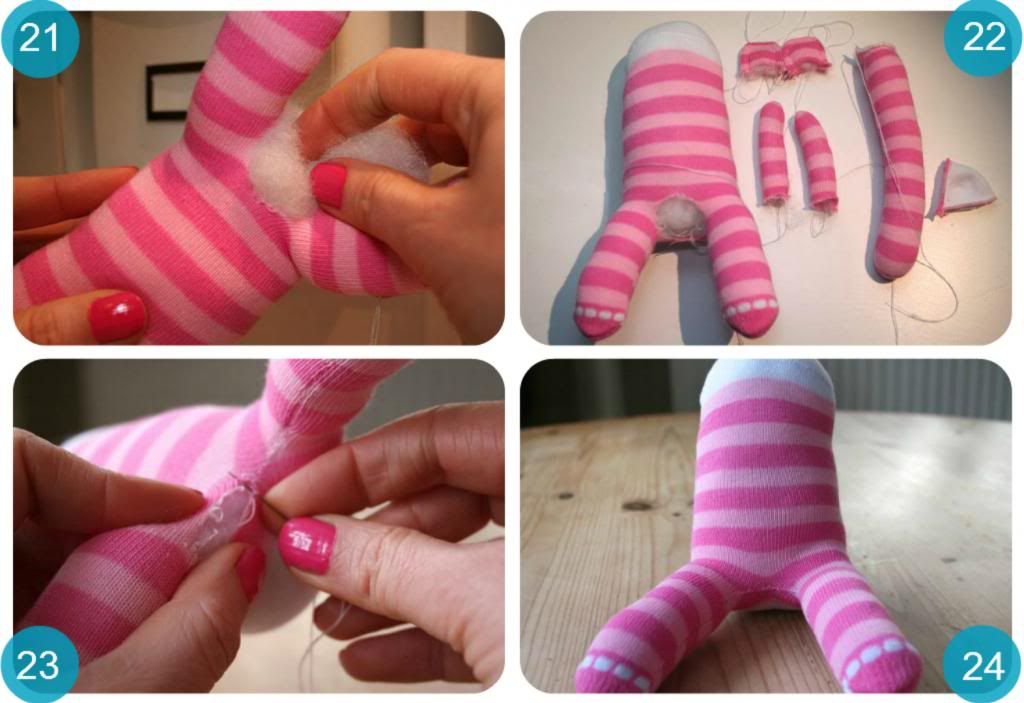
21. Using the gap in the monkey crotch, carefully stuff the torso with wadding. Try not to stretch the crotch gap (sorry, there's no polite way of saying that!) Use a knitting needle to the stuffing right into the legs. Be generous, you want a firm chunky monkey.
22. Stuff the arm and tail pieces, again using the knitting needle to get right to the ends. You should now have a stuffed body, 2 arms, a tail, 2 ears and a snout as in the pic.
23. And here's why we left those long threads. Using one of the long threads, sew up the crotch opening using slip stitch, turning in the raw edges. Using the long threads from the machine stitching means you don't have to worry about securing the thread as you start, it's not going to unravel. Secure the end and trim the thread leaving a couple of inches, hide this loose end in the body.
24. Your monkey body is done!
Itching to get stitching!
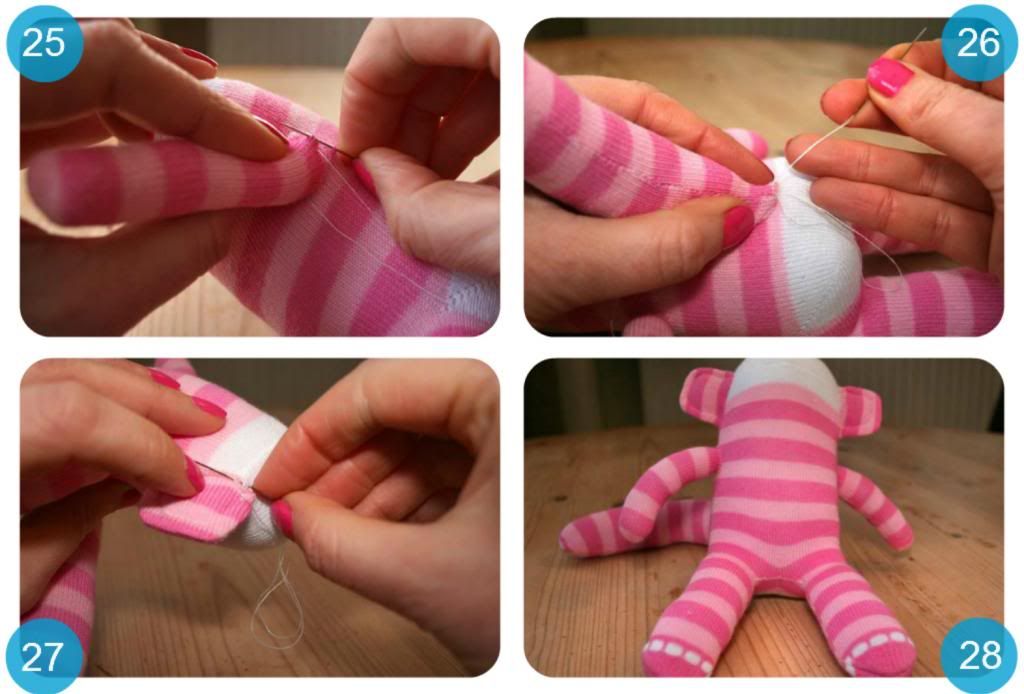
25. Attach the arms on the monkey approximately halfway down the torso. Using one of the long threads left from machine sewing, hand sew the arm to the body. Use small stitches and tuck the raw edges under. I sew around the arm twice, then knot and hide the loose end in the monkey body.
26. Attach the tail to the monkey in the same way. I position the tail just above the heel of the sock (monkey's bottom!)
27. Attach the ears, once again using the long threads to hand sew the ears on each side of the monkeys head. I position the ears midway between the arms and the tip of the head.
28. And your monkey is now looking very monkey-like!
Chin up!
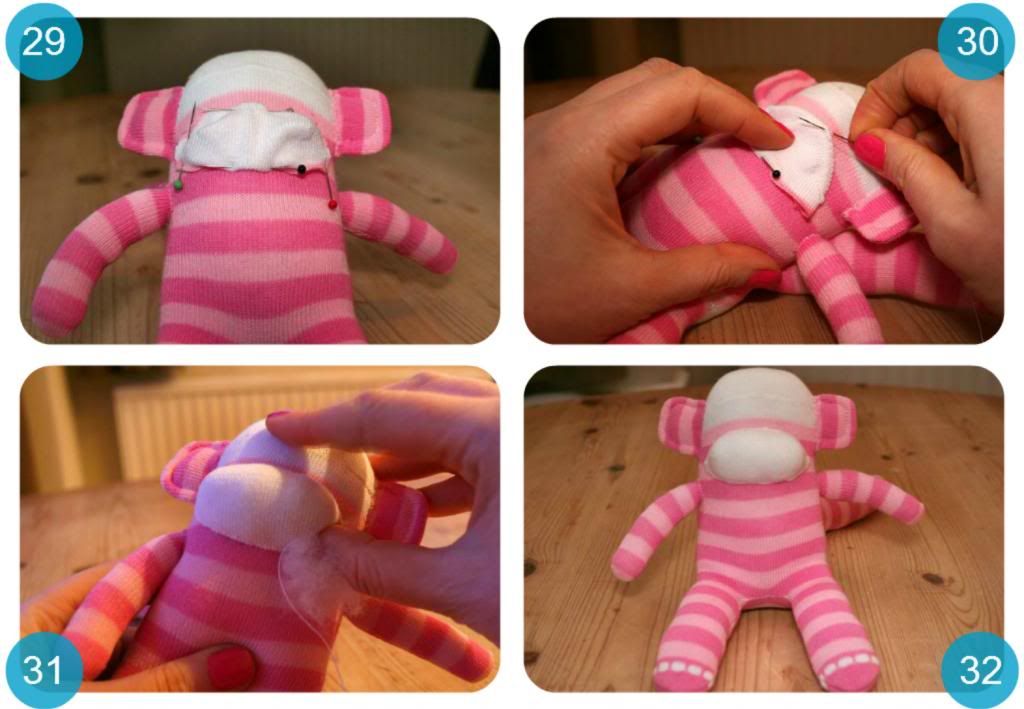
29. Take the heel piece cut from the second sock in step 8 and pin it to the monkeys face. I line up the edge of the snout midway between the arm and ear. Do not pin the snout tight & flat, it needs room for the stuffing.
30. Hand sew the snout to the body, tucking the raw edges under and using small stitches. Leave a half inch gap for stuffing.
31. Stuff the snout firmly.
32. Hand sew the opening closed.
Give us a smile
33. Make the monkey's smile. Thread a large needle with wool and insert it from the back of the monkeys head, bringing the needle out at the edge of the snout.
34. Do a single backstitch at the edge of the mouth.
35. Take the wool over the snout and do a single backstitch at the other side of the mouth, taking the needle back through the head and snip off the remaining wool.
36. You now have a monkeys smile that needs stitching into place, you don't want a sad monkey!
Let's face it, we're nearly there!
37. Thread a needle with cotton, matching the colour of the wool smile. Start at one end of the smile, use small stitches over and under the wool, catching it into place.
38. At this point you can attach buttons for eyes, but for safety sake I've been making felt eyes. Take a white circle of felt. Thread a needle with blue (or black) embroidery thread and create a pupil, I just criss cross stitches in a star pattern.
39. Attach the eyes using blanket stitch around the felt circles.I position them just touching the snout.
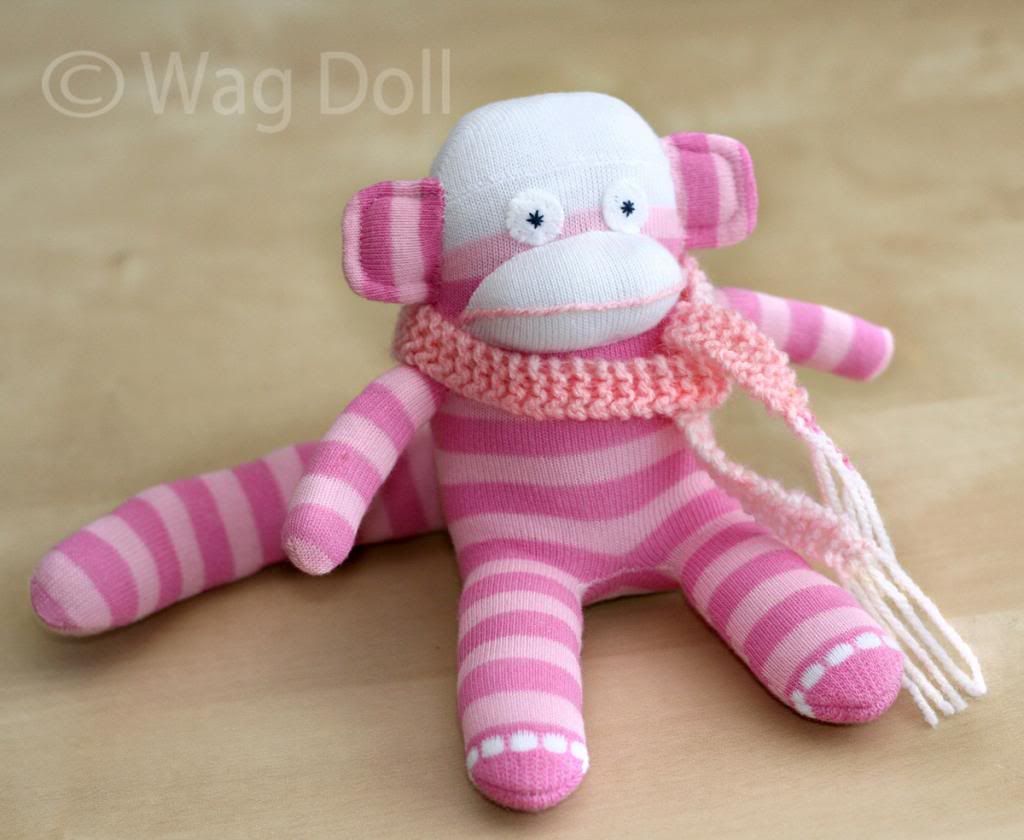
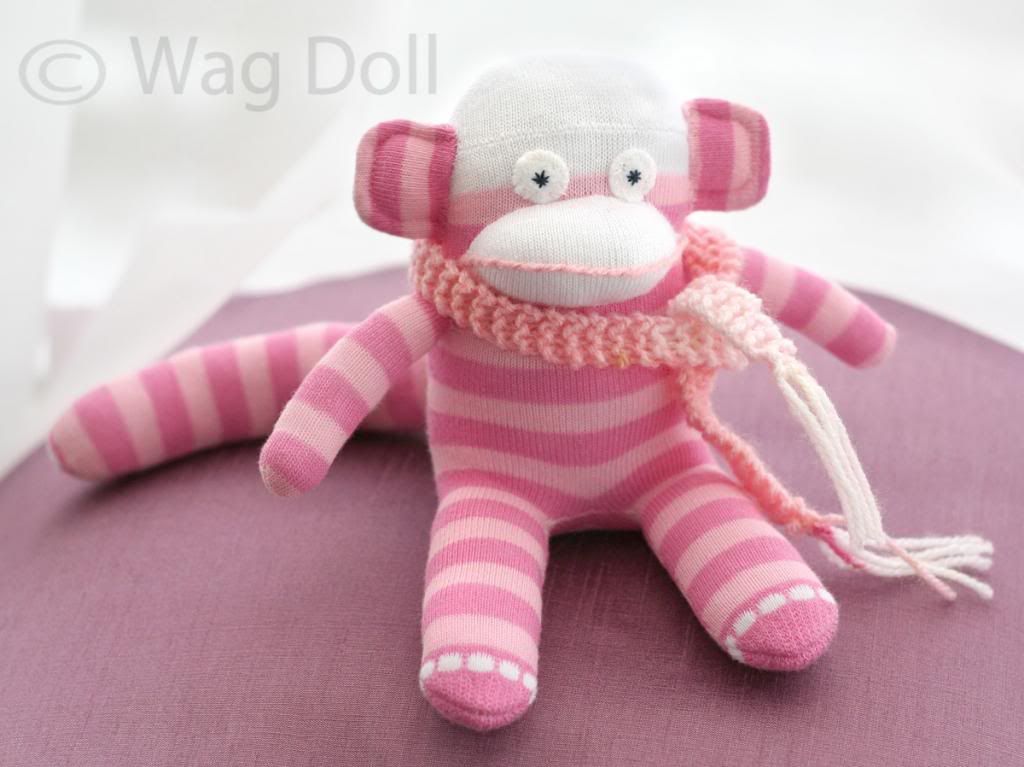
40. And you've finished, congratulations on the arrival of your new baby monkey!
I hope this step by step tutorial has been helpful, and while there are 40 steps listed, once you have made a few monkeys you'll realise just how easy they are.
Of course you can always dress your monkeys too, mine are often seen wearing a scarf, a tutu or sometimes both! Let me know if you'd like a tutorial on how I do either of these, or if you have a go at making a monkey yourself.
(Please note: tutorial for personal use only, not for resale)


Comments
I am going to try to make 2. One for each of my great granddaugters.
I have been looking for one about the size of a six year old to use in our hand percussion band . . . have looked far and wide. Any suggestion?
Thank you for taking the time to share.
I would like to know how to dress please.
My granddaughter will be the talk of the family!!
Diana
Thank you for taking the time to share.
I would like to know how you dress your baby please.
My granddaughter will be the talk of the family!
Diana
Love
Manee
Baby Items Online
Post a Comment
I love reading your comments, so let me know what you think! x