Boudoir Tulle Christmas Tree - Tutorial
I know it's only mid November and far too early to be blogging about Christmas, but last year I posted my Twinkle Toes Sequin Stocking Tutorial in December, which didn't allow much time for people to source fabric and get sewing.
So this year I'm posting my festive goodies early, mainly because I couldn't wait to share this tutorial with you... The Boudoir Tulle Christmas Tree!
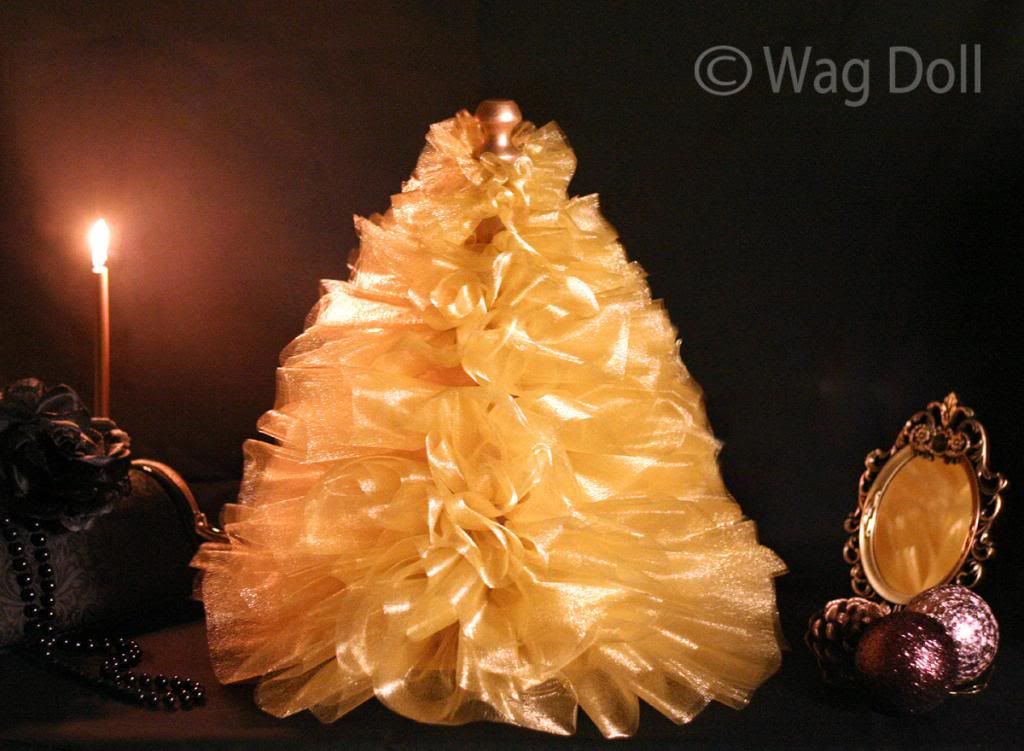
Frothy, decadent and totally glamorous, the tulle tree can adorn your dressing table while you get ready for Christmas parties, or be your table centre piece on Christmas day.
Read on for the tutorial...
Instructions:
The base and 'trunk' of the tree are made from a wooden kitchen roll holder.
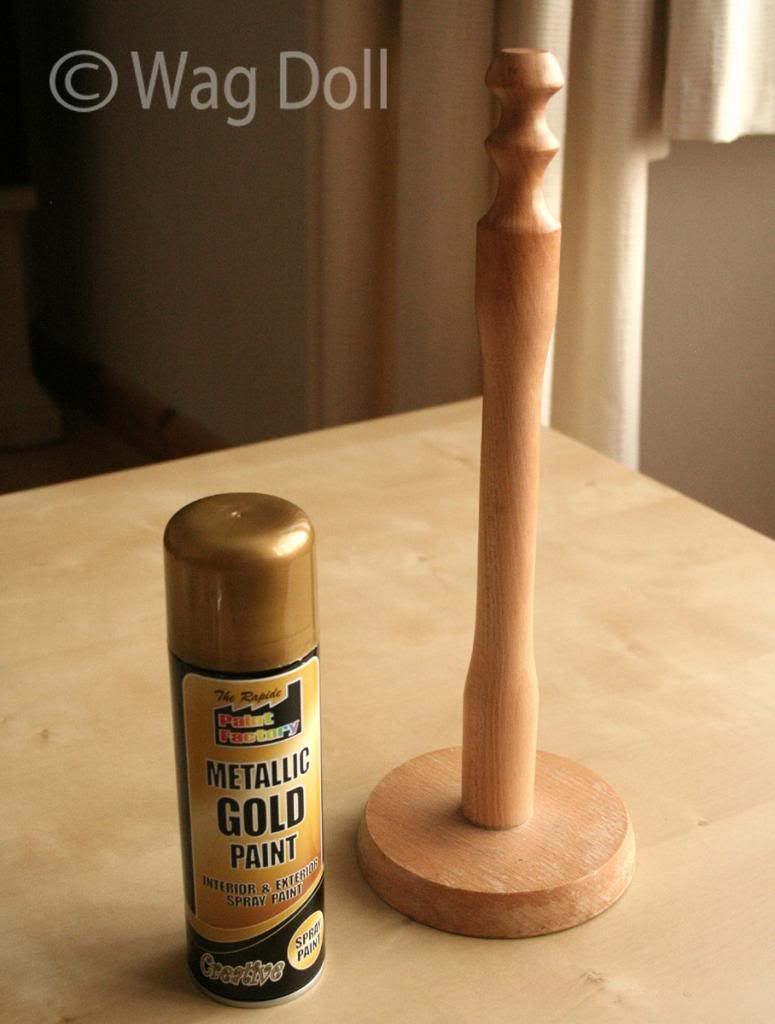
I had actually bought a new one before this project and wanted to recycle my old wooden pine holder. You could always make something similar from a block of wood and dowling...but since I haven't done any carpentry since Mr Smith's woodworking class aged 9, I went down the recycling route! (PS. In case you're interested I got a C+ for my plant pot holder.)

Sand the kitchen roll holder and spray with gold paint (or a colour to match your fabric).
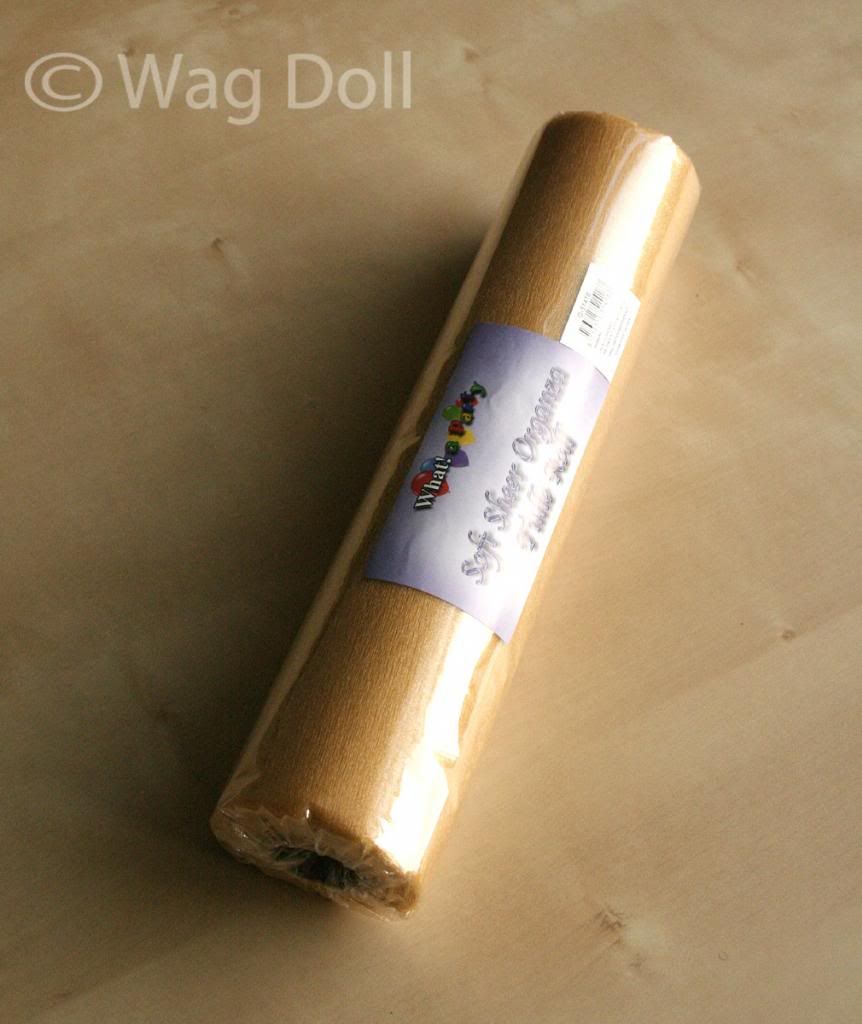
Now cut your fabric strips.
My organza fabric arrived on a roll 11 inches wide so that's the width of the base of my tree.
I cut the following strips:
11" x 66" 28cm x 165cm
10" x 66" 25cm x 165cm
9" x 60" 22cm x 150cm
8" x 60" 20cm x 150cm
7" x 48" 17cm x 120cm
6" x 48" 15cm x 120cm
5" x 36" 13cm x 90cm
4" x 36" 10cm x 90cm
3" x 36" 8cm x 90cm

Starting with the widest strip, fold it in half lengthwise so the first strip is now 5.5" wide by 66" long.
Sew a basting stitch (very long straight stitch for gathering) along the folded edge, a quarter of an inch in from the fold.
I forgot to take pics of my golden tulle tree, this fabric is for my bronze net tree but the method is exactly the same, regardless of your fabric. Be sure to leave long threads at the start and end of your stitching and do not back stitch.

Pull on one of the loose threads, to gather up the fabric tightly. Knot securely and then tie both ends together to create a circle.
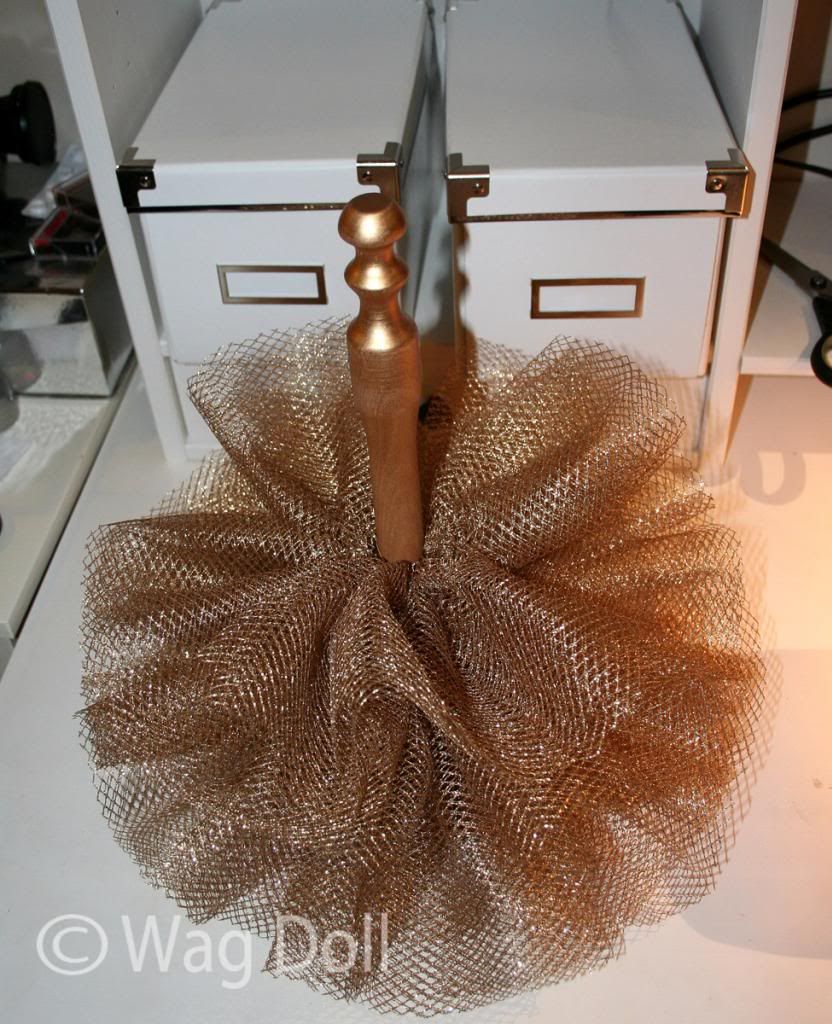
Add your first layer to your tree 'trunk' and repeat the steps for all your remaining fabric strips.
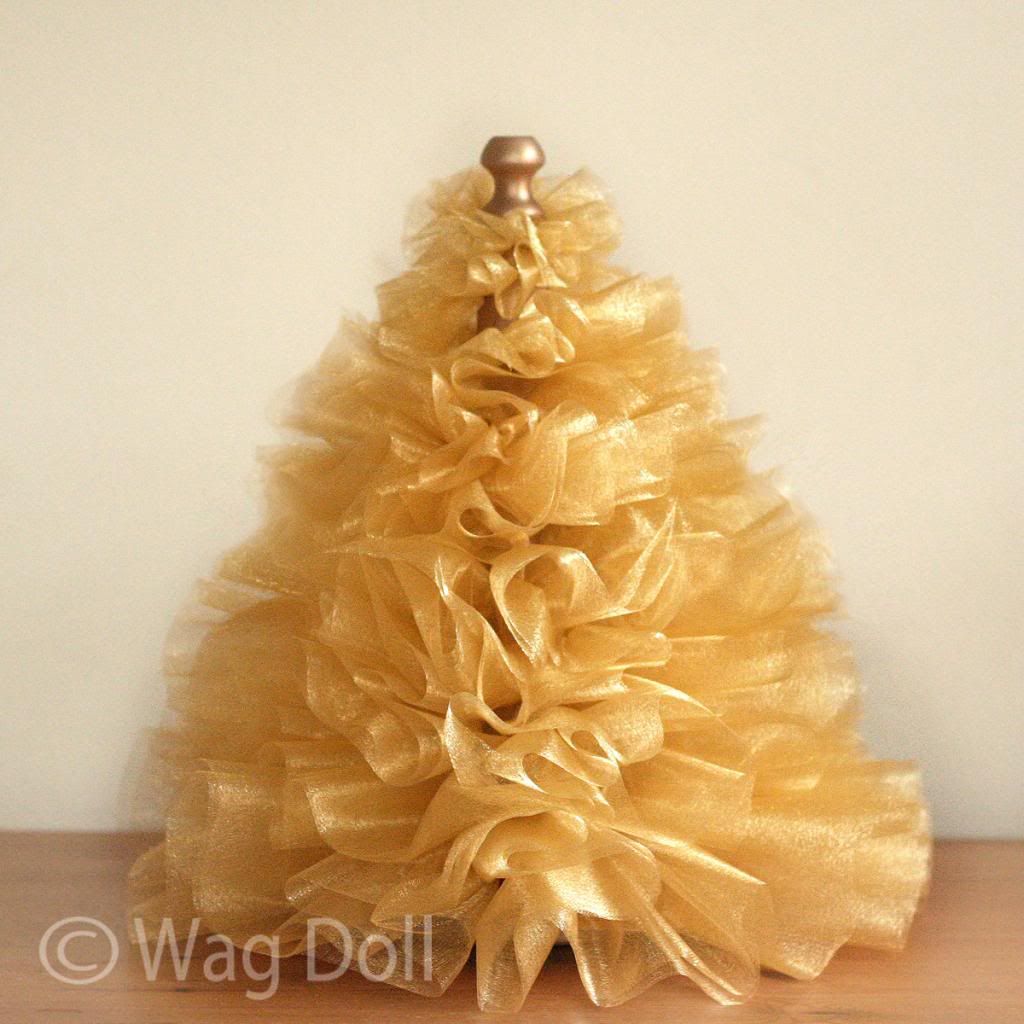
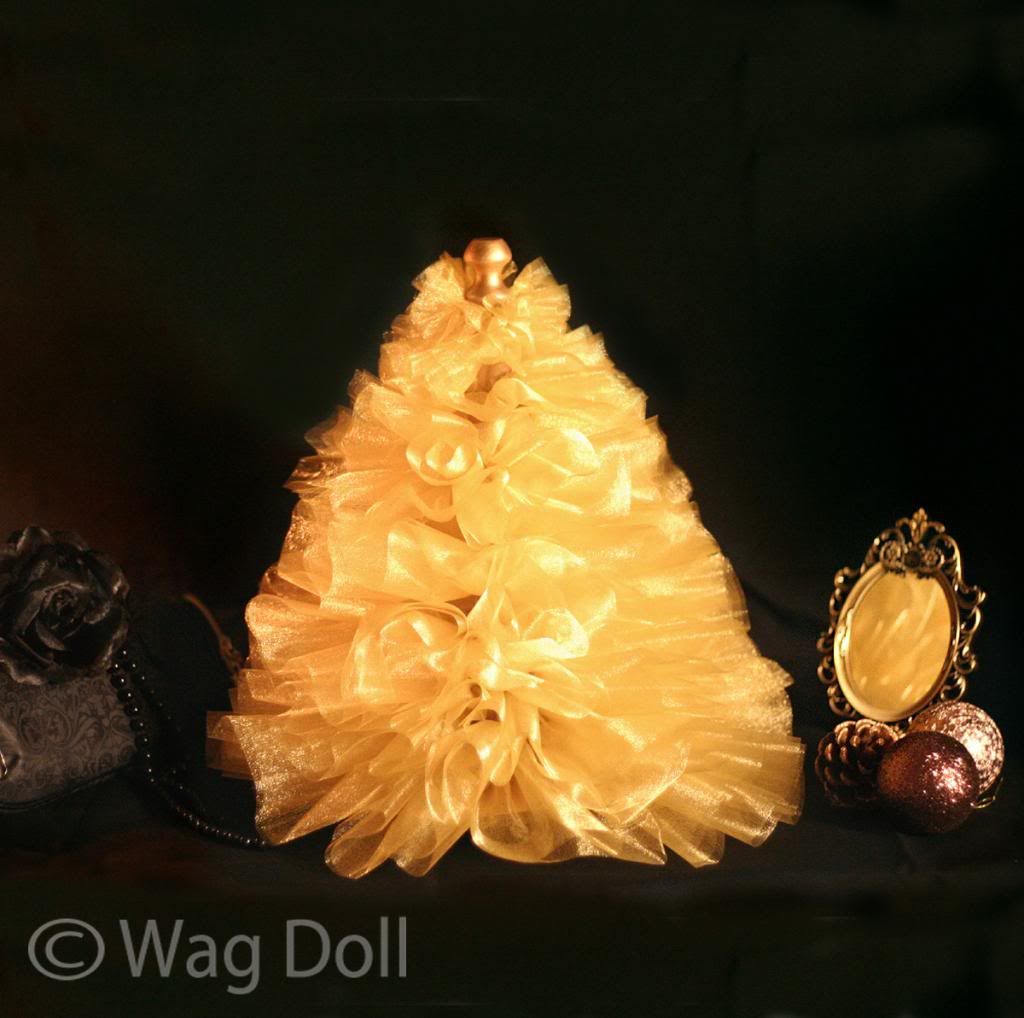
'Fluff your ruffles' and admire!
You can make the tulle tree in any colour you like to match your decor. I've gone for gold, to match all the fabulous jewellery I'll be receiving on Christmas day...*wake up Wag Doll* ....hmmm more like to match the apron I'll be wearing to cook the Christmas dinner!
(Please note: tutorial for personal use only, not for resale)
So this year I'm posting my festive goodies early, mainly because I couldn't wait to share this tutorial with you... The Boudoir Tulle Christmas Tree!
Frothy, decadent and totally glamorous, the tulle tree can adorn your dressing table while you get ready for Christmas parties, or be your table centre piece on Christmas day.
Read on for the tutorial...
Instructions:
The base and 'trunk' of the tree are made from a wooden kitchen roll holder.
I had actually bought a new one before this project and wanted to recycle my old wooden pine holder. You could always make something similar from a block of wood and dowling...but since I haven't done any carpentry since Mr Smith's woodworking class aged 9, I went down the recycling route! (PS. In case you're interested I got a C+ for my plant pot holder.)
Sand the kitchen roll holder and spray with gold paint (or a colour to match your fabric).
Now cut your fabric strips.
My organza fabric arrived on a roll 11 inches wide so that's the width of the base of my tree.
I cut the following strips:
11" x 66" 28cm x 165cm
10" x 66" 25cm x 165cm
9" x 60" 22cm x 150cm
8" x 60" 20cm x 150cm
7" x 48" 17cm x 120cm
6" x 48" 15cm x 120cm
5" x 36" 13cm x 90cm
4" x 36" 10cm x 90cm
3" x 36" 8cm x 90cm
Starting with the widest strip, fold it in half lengthwise so the first strip is now 5.5" wide by 66" long.
Sew a basting stitch (very long straight stitch for gathering) along the folded edge, a quarter of an inch in from the fold.
I forgot to take pics of my golden tulle tree, this fabric is for my bronze net tree but the method is exactly the same, regardless of your fabric. Be sure to leave long threads at the start and end of your stitching and do not back stitch.
Pull on one of the loose threads, to gather up the fabric tightly. Knot securely and then tie both ends together to create a circle.
Add your first layer to your tree 'trunk' and repeat the steps for all your remaining fabric strips.
'Fluff your ruffles' and admire!
You can make the tulle tree in any colour you like to match your decor. I've gone for gold, to match all the fabulous jewellery I'll be receiving on Christmas day...*wake up Wag Doll* ....hmmm more like to match the apron I'll be wearing to cook the Christmas dinner!
(Please note: tutorial for personal use only, not for resale)


Comments
Thanx
Beautiful idea my mind is now working overtime, thanx for sharing
Thanks for sharing. Love it.
Thanks.
Sue
Post a Comment
I love reading your comments, so let me know what you think! x