How to Add Social Media Buttons To Your Blog - The Easy Way!
Welcome to the 2nd in my series of Blog Upgrade Tips, be sure to check out my previous tip "How to Add 'You Might Also Like...' To Your Posts.
Over the last few weeks I've been upgrading my blog and now have a lovely new look. I also wanted to add some social media link buttons, so readers can connect with me via Twitter, StumbleUpon and Youtube.

And after much searching I've find a very easy way of generating the clicky buttons and the HMTL code that will transport readers to your various social media accounts. This works for Facebook, Pinterest and LinkedIn as well as the one's I've used...and many more too!
Read on for a step by step guide...
Now, most of the information I found about adding social media links gave you some lovely buttons to choose from, and then left you to go away and write your own HTML code.... eh?!
I'm afraid that's a bit beyond my capabilities, so praise be for Top Producer and their social media widget generator, which will write all the code for you!
Here's step by step guide to adding social media buttons to your Blogger blog. It looks like a lot of work, but I've gone through each step in detail, it really is just a few clicks and very easy.
In this example I'm going to choose Twitter.
(Alternatively if you can't remember your exact username, open the social media site you're linking to and go to your profile page, copy the web address of your profile page and paste that into the 'path to profile' box.)

Well done, you've added social media buttons to your blog without the need to write any HTML code, thank you Top Producer!
Over the last few weeks I've been upgrading my blog and now have a lovely new look. I also wanted to add some social media link buttons, so readers can connect with me via Twitter, StumbleUpon and Youtube.
And after much searching I've find a very easy way of generating the clicky buttons and the HMTL code that will transport readers to your various social media accounts. This works for Facebook, Pinterest and LinkedIn as well as the one's I've used...and many more too!
Read on for a step by step guide...
Now, most of the information I found about adding social media links gave you some lovely buttons to choose from, and then left you to go away and write your own HTML code.... eh?!
I'm afraid that's a bit beyond my capabilities, so praise be for Top Producer and their social media widget generator, which will write all the code for you!
Here's step by step guide to adding social media buttons to your Blogger blog. It looks like a lot of work, but I've gone through each step in detail, it really is just a few clicks and very easy.
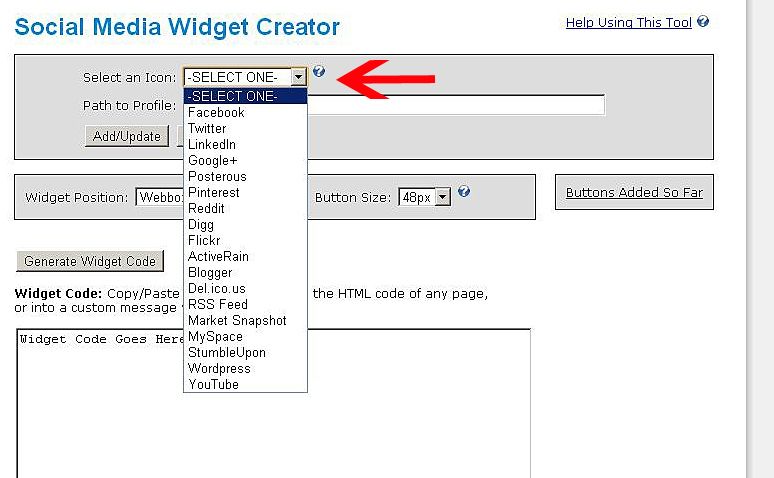
- Click on Top Producer's Widget Generator
- From the 'Select an Icon' drop down menu, choose one of the social media sites you want to link to.
In this example I'm going to choose Twitter.
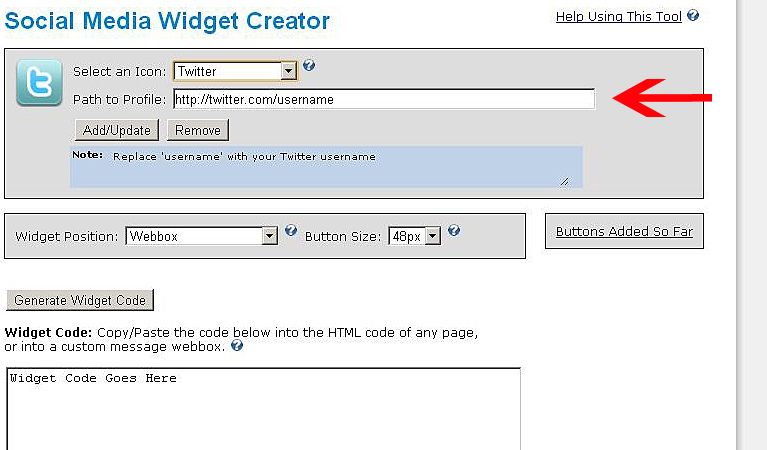
- Now follow the instructions in the blue shaded box, in this example replacing 'username' with your Twitter profile name.
(Alternatively if you can't remember your exact username, open the social media site you're linking to and go to your profile page, copy the web address of your profile page and paste that into the 'path to profile' box.)
- Click the 'Add/Update' box and the requested social media icon will appear under the 'Buttons so far' box.
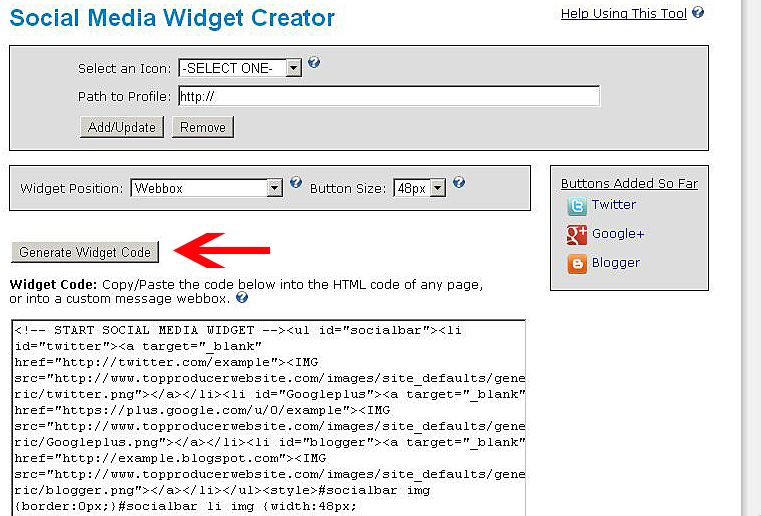
- Repeat these steps selecting all the different social media sites you want to add. You will then have a lovely list under the 'Buttons so far' box
- Leave the 'Widget position' set to the default of 'Webbox', and the 'Button Size' set to '48px'.
- Click the 'Generate Widget Code' button and see all that lovely code appear like magic!
There's no way I'd be able to write all that!
- Select all the code (and make sure you've got all the code), then copy it.
- Open up your Blogger account and go to the Layout page, click 'add a gadget'
- Choose the 'HTML/Javascript' option, then paste the HTML code into the content box and click 'save'
- You can now choose where you want the social media buttons to be on your blog by dragging the HTML/Javascript gadget into place on your Layout page.
- Click 'preview' to check everything is looking good, then click 'save arrangement' and admire!
- Click on all your links to check they work correctly
Well done, you've added social media buttons to your blog without the need to write any HTML code, thank you Top Producer!
Hope this guide was helpful, and apologies for the in-depth nature of it. I'm probably stating the obvious in some steps, but I like step by step guides until I'm confident in what I'm doing.
And don't forget to check out my other blog upgrade tip "How to add 'You Might Also Like' To Your Posts"
And don't forget to check out my other blog upgrade tip "How to add 'You Might Also Like' To Your Posts"
By the way, I hope you like my new blog design, comment and let me know what you think!


Comments
Email archive
Post a Comment
I love reading your comments, so let me know what you think! x